So, I'm always impressed by the bloggers who do these REALLY amazing Step-by-step tutorials for DIY's and I can't even imagine the amount of time it took them to make their item with all the stoping and snapping they were doing; not to mention how long it would take to organize all the shots and directions in their 20 mile long blog post.
To you, fearsome tute-blogger, my hat is off.
But, honestly, I don't need that much direction. So I skip over the tiny steps and leap to the end where I go, 'Oh, yeah, like that', then I run off to the sewing room and whip it up. So, this tutorial is gonna be like that; highlights and bam, your done. :^) If you need more steps, or have questions, I'm MORE than willing to answer anything in the comments below!
What You'll Need:
2 shirts of the same exact brand, style, size, but different colors/patterns
That's pretty much it. Well, besides a sewing machine, pins, scissors and matching thread. But we all knew that!
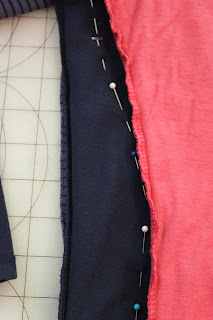
First off, check the sizing. If it doesn't fit you right, you wont wear it right and it wont look as cute and you wont like it and you just might give up on your sewing skill and chuck the machine out the window... But before you do that! Find a shirt that DOES fit you nice and lay it on top of both shirts to for this project and start pinning. Like this! vv
Pin the first shirt, then the second shirt underneath, following the lines of the shirt you know fits and you love because of it. Then you will stitch along the inside of this pinning line [or right on the pin line].
Remember to follow on up into the sleeves if they are larger then the sleeves of your favorite shirt. Then let the line decrease as you near the end of the sleeve.
Above is my two shirts altered to fit me from using a shirt I already love the fit of. [After this I trimmed a 1/4 inch seam allowance and surged the edges to finish.
Then I shortened the sleeves to 3/4 length and simply surged them to finish; didn't mess with any fancy finishing and it rolls up cute!
Now, fold your shirt in half, making sure the seams line up and it is very smooth. Then cut it down the middle. I did one layer at a time, the first...
... then folded that layer back and cut the second layer. [that way if there was a weird fold on the underneath layer, I wont just cut right through it and mess up my nice straight line]
I almost forgot! Remove the tags before you cut the shirts in two. It will be easier.
Now for the awesome part! Take the right side of one color/pattern of shirt, and pin it right-sides-together with the left side of the opposite shirt. {make sure you have fronts to fronts and backs to backs}
another shot of the fronts pinned right sides together.
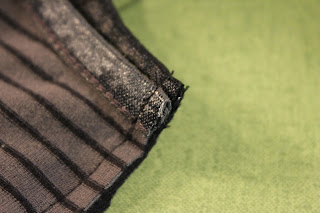
Don't do this. Due to the slippery satin trim it liked to slip unevenly. This is tacky. Get out that seam ripper and make it right. Even Steven!
First shirt done! Still inside out, stitched and surged.
Do the same thing with the next shirt and you have a cute shirt and an extra to give to a friend!
From this...
...to this!
__________________________________
Enjoy! Have a great weekend!
Kerry


Hey Kerry, Me and you need to make friendship shirts! That would be so fun<3 - Glizzy, A Dragon Rider
ReplyDeleteGood idea, Glizzy! We need to be on the look out for some shirts we can do this with! :^D
Delete<3 - Kiwi, A Dragon Writer