Showing posts with label do it yourself. Show all posts

Thursday, February 13, 2014

Adventures in Wedding Tripping + DIY Embroidery Hoop Wedding Gift

Once upon a time...

So, I had this friend. And she is pretty cool. We met once in Missouri and then she went back home to Northern Illinois and we wrote letters for four years before we met again.


Then I visited her. And she had a party, so I got to meet all her cool friends that she'd been writing to me about for the past four years. 


Then they became my friends, too! 


Then one day, two of those friends of my friend, got friendlier. ;^) Having known each other for, like, ever, they discovered that it was no accident that they were such good friends.


So, 'they knew that this was much more than a hunch', and he asked, and she said yes, and plans were made, and invitations sent. And this friend of a friend [me!] was invited to go [and bring a guest!]. 


So there I was, hum-druming, about who I could take with me... And I decided to take one of my awesome best friends, so these cool people could meet. 


We had a great adventure journeying to the north country and over came many obstacles [really, it's a long story]. And finally made it there the day of the wedding!  


We primped and drove through the snowy city-side to a beautiful church and witnessed a beautiful union of God joined love-birds. [The bride walked down the isle to the song "Life is Beautiful" by the afters; like my favorite part!]


Hearts were moved, lives joined, hearty laughter had by all and happy tears shed. 


They were pronounced Husband and Wife, there was a kiss, and a grand exit. There was a starbucks pit stop, and a quaint reception with adorable details, keurig coffee, tasty horderves, donuts and cupcakes. There were pin-wheels and mason jars, striped straws and baby cheese balls, there were old friends and new, precious flower girls and more cupcakes. And...


There was snow. More and more snow. It was magical. It softly glistened the whole day, covering anything that wasn't already hidden in snow. 


There were instagram moments and well wishes. There was speeches and tears, speeches and laughter, there were clinking glass and kisses, there was joy all around. And a proper send off in the snow on their way to a honeymoon destination. 


Then there were leaving guests, and guests who didn't want to leave. There were some goodbyes, and other-non-goodbyers. There were mentioned plans, and then sitting and soaking in the last moments of a glorious day. There was talking, and then no talking, but there was still a sort of communication. There was still snow as darkness fell, comfy clothes where exchanged for formal ones, people piling in cars to skid through the snow packed 'back-roads', and a stop at Oberwise where there was shared chocolate milk for all.


Then these Southern Missouri girls [Missour-ee, not Missour-a!!] where taken back to the train for another journey [thought less eventful!] with the memories of a whirlwind weekend still swirling in our heads. There was long talks, and no talk, and there was lots of snack eating. There was interesting train-rest-room-going, and lots of IL fields covered in snow. There were bridges and the Arch, there were parents waiting for us at the station, there was two more hours of sitting in a confined space, and then...

There was home. 


Happy Thursday,
Kerry

Thursday, January 30, 2014

DIY Upcycle That Old Cork Board... Before it ends up in the trash...

I'm purposing to post to the blog once a week this year. I'm already behind a couple so I'm going to try and catch up and then grace you with a new lovely every Wednesday. :^) We'll see how that goes! 

Last month, I took a day and updated an old cork board for my studio. It was one that I pulled out of a trash can! Everything has potential. :^) 


Here it is before.


This board had lots of use in it's first life. It just needs some sprucing up!


Paint is the first order of business. 


Then some pretty silk fabric. I cut it to size and then hot glued the edges all the way around. 


Love my little glue gun. :^) This is a close up of the ribbon I added to hide the rough edges of the silk and it makes a smashing boarder.


And it's done! 


I put it to use right away. 


It really added some class to my little studio/office. 

Thanks for reading! Have a great day!
-Kerry-

Friday, July 26, 2013

Friendship Shirts - Tutorial

I'm going to put together a little tutorial of how to make friendship shirts. You've seen friendship bracelets, and necklaces, and rings, and bread, but have you ever seen friendship shirts???


So, I'm always impressed by the bloggers who do these REALLY amazing Step-by-step tutorials for DIY's and I can't even imagine the amount of time it took them to make their item with all the stoping and snapping they were doing; not to mention how long it would take to organize all the shots and directions in their 20 mile long blog post.

To you, fearsome tute-blogger, my hat is off.

But, honestly, I don't need that much direction. So I skip over the tiny steps and leap to the end where I go, 'Oh, yeah, like that', then I run off to the sewing room and whip it up. So, this tutorial is gonna be like that; highlights and bam, your done. :^) If you need more steps, or have questions, I'm MORE than willing to answer anything in the comments below!


What You'll Need:
2 shirts of the same exact brand, style, size, but different colors/patterns

That's pretty much it. Well, besides a sewing machine, pins, scissors and matching thread. But we all knew that!

First off, check the sizing. If it doesn't fit you right, you wont wear it right and it wont look as cute and you wont like it and you just might give up on your sewing skill and chuck the machine out the window... But before you do that! Find a shirt that DOES fit you nice and lay it on top of both shirts to for this project and start pinning. Like this! vv
 
Pin the first shirt, then the second shirt underneath, following the lines of the shirt you know fits and you love because of it. Then you will stitch along the inside of this pinning line [or right on the pin line].

Remember to follow on up into the sleeves if they are larger then the sleeves of your favorite shirt. Then let the line decrease as you near the end of the sleeve.

Above is my two shirts altered to fit me from using a shirt I already love the fit of. [After this I trimmed a 1/4 inch seam allowance and surged the edges to finish.

 
Then I shortened the sleeves to 3/4 length and simply surged them to finish; didn't mess with any fancy finishing and it rolls up cute!

 
Now, fold your shirt in half, making sure the seams line up and it is very smooth. Then cut it down the middle. I did one layer at a time, the first...


... then folded that layer back and cut the second layer. [that way if there was a weird fold on the underneath layer, I wont just cut right through it and mess up my nice straight line]

 
Your shirt should look about like this now. Go ahead and do the same thing to the other one!

 
I almost forgot! Remove the tags before you cut the shirts in two. It will be easier.

 
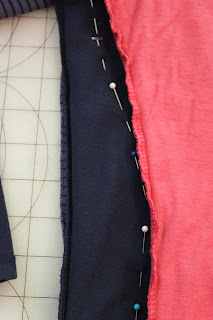
Now for the awesome part! Take the right side of one color/pattern of shirt, and pin it right-sides-together with the left side of the opposite shirt. {make sure you have fronts to fronts and backs to backs}

 
another shot of the fronts pinned right sides together.
 
 
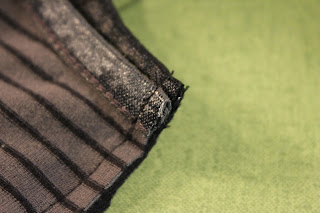
Don't do this. Due to the slippery satin trim it liked to slip unevenly. This is tacky. Get out that seam ripper and make it right. Even Steven!

 
First shirt done! Still inside out, stitched and surged.

 
Do the same thing with the next shirt and you have a cute shirt and an extra to give to a friend!
 
 
From this...
 
 
...to this!
 

__________________________________
 
Enjoy! Have a great weekend!
Kerry